How to hang clock on wall? A step-by-step guide
How to Hang a Wall Clock?
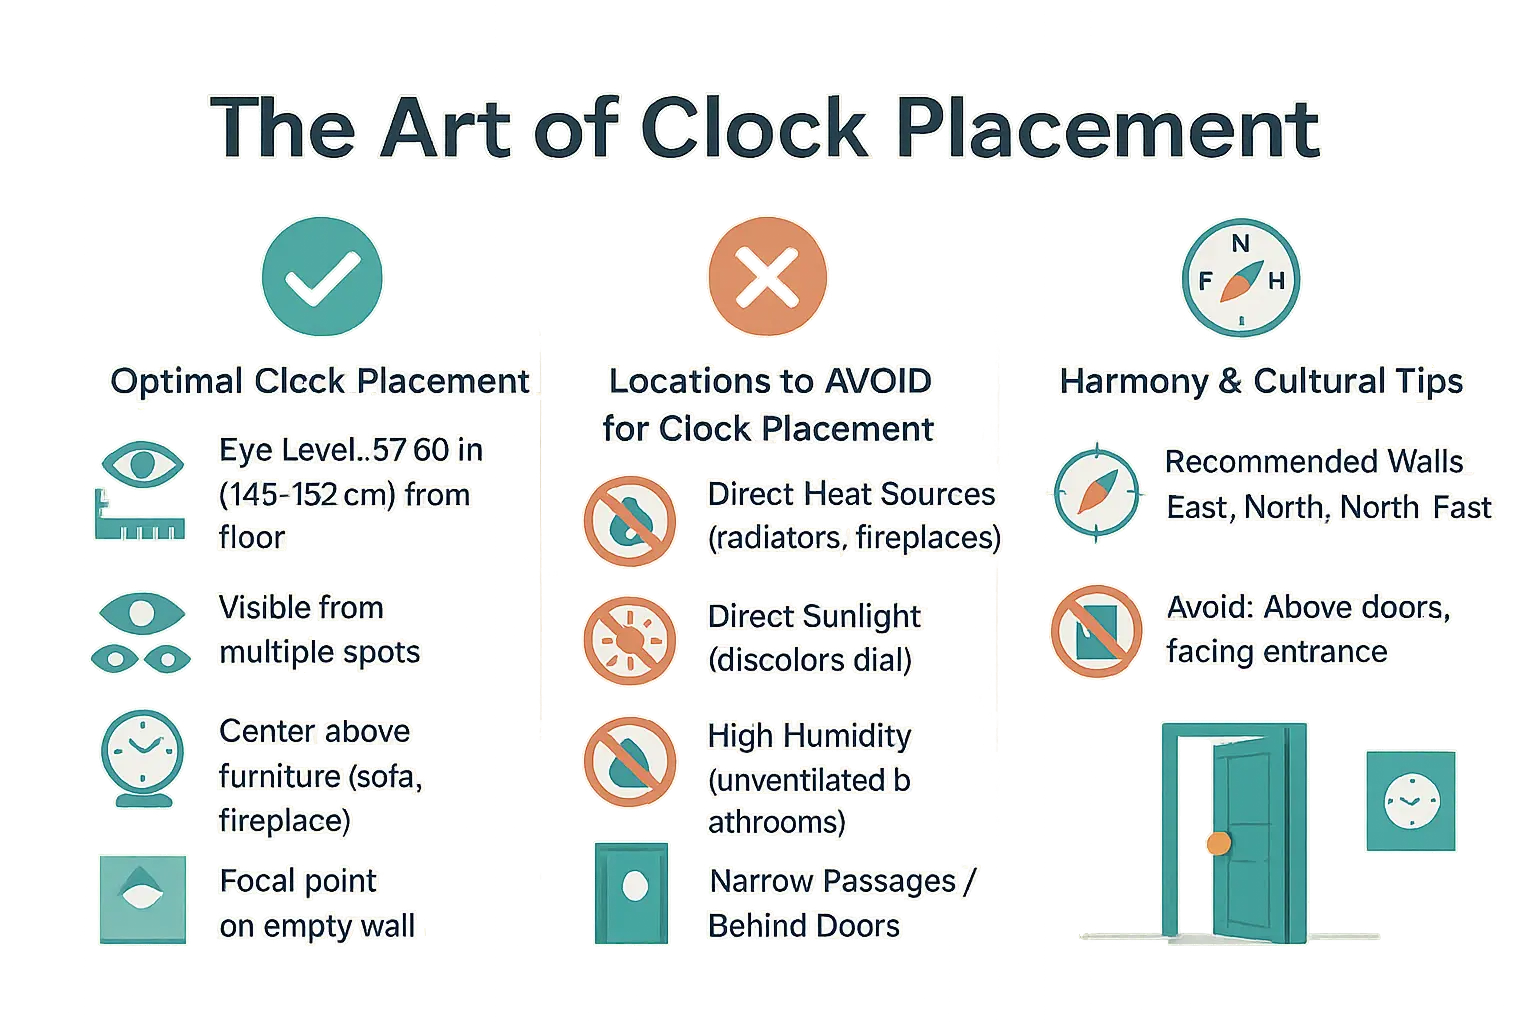
The essential takeaway: Prioritize fixture-wall-clock weight compatibility for safety and aesthetics. Match hardware to wall type (drywall, brick) and clock weight—nails for under 5 lbs, anchors for 5-20 lbs, studs or toggle bolts for over 20 lbs. This prevents damage and ensures longevity. Crucially, eye-level placement (57-60 inches) balances visibility and design harmony.
Ever struggled to hang clock wall without it tilting, crookedly defying symmetry—or worse, crashing down unexpectedly? You’re not alone. This guide decodes the exact steps to securely mount your clock while boosting your wall decor, whether you’re navigating drywall, brick, or finicky pendulum clocks. Discover how to pick the ideal spot at eye level (145-152 cm for most rooms), avoid direct sunlight that fades dials, and pair fixtures to clock weight for unshakable stability. From mastering stud finders to no-drill hacks, you’ll learn to transform a headache into a polished, 10-minute upgrade. Say goodbye to wobbles and hello to timeless precision—your walls (and sanity) will thank you.
- First things first: choosing the right location for your clock
- Gathering your supplies and preparing the wall
- The most crucial step: matching the fixture to your wall and clock
- How to hang a clock on a wall: step-by-step instructions
- Advanced Tips And Final Security Checks
- Key Takeaways For A Perfectly Hung Clock
First things first: choosing the right location for your clock
Finding the sweet spot: visibility and aesthetics
WikiHow recommends eye level placement (57-60 inches/145-152 cm) to balance functionality and decor while avoiding neck strain. Center clocks 4-6 inches above furniture like mantels or consoles. For gallery walls, let the clock anchor the display without centering it – offset positions create visual interest.
Test positions with a paper template matching your clock’s dimensions to verify readability from seating zones or kitchen workspaces. Prioritize spots where the clock complements daily routines – living room focal walls or kitchen prep zones work best. Match the clock’s scale to its surroundings: oversized pieces dominate large walls, while smaller clocks suit narrower spaces like hallways.
Where not to hang a clock: practical and safety considerations
Avoid direct sunlight (fades clock faces) and heat sources like radiators – thermal changes warp mechanisms. Skip high-humidity areas like unventilated bathrooms. Never mount clocks in crowded walkways where impacts risk damage, or near electronics that generate heat.
A touch of harmony: placement tips from Feng Shui and Vastu
For energy flow, Feng Shui suggests living room placements in Li (reputation) or Xun (wealth) sectors. Vastu Shastra favors North (wealth) or East (productivity) walls. Both traditions warn against multiple clocks in one room – single timepieces maintain balance.
Keep clocks away from beds (tic-tac noises disrupt sleep) and mirrors (energy reflection). Prefer round-faced clocks for smooth flow, following Vastu’s material guidelines (metal for Northern walls, wood for Eastern). Always ensure clocks run accurately – broken ones symbolize stagnant energy, contradicting their purpose of promoting progress. Avoid dark clock faces in Vastu, as they absorb positive light energy.
Gathering your supplies and preparing the wall

The essential toolkit for hanging a clock
- Tape measure: Positions clocks at eye level (60–66 inches from the floor) for balanced placement.
- Pencil: Marks fixture spots lightly to avoid permanent marks.
- Level: Ensures straight alignment to prevent wobbling or skewed displays.
- Stud finder: Locates studs for secure mounting of clocks over 10 lbs.
- Hammer or Drill: Drills pilot holes or sets nails—use a drill for anchors.
- Fixtures: Match hardware to weight:
- Under 5 lbs: Adhesive hooks or small nails.
- 5–10 lbs: Drywall anchors or screws.
- Over 10 lbs: Stud-mounted screws or toggle bolts.
Prepping your wall for a flawless installation
Clean the wall with a clean cloth to remove dust. Use isopropyl alcohol only for adhesive hooks to ensure strong bonding.
Fill cracks with spackle, sand smooth, and wipe dust. Uneven surfaces weaken anchor grip or adhesive hold.
Select fixtures by wall type:
- Drywall: Use weight-rated anchors. Heavy clocks (over 15 lbs) need stud-mounting.
- Plaster: Drill pilot holes first. Toggle bolts grip securely in hollow walls.
- Brick/Concrete: Use masonry anchors and load-rated screws.
Mark the spot with a pencil dot. Align the level straight for precise placement. For studs, confirm the center with a finder before drilling to avoid missing.

The most crucial step: matching the fixture to your wall and clock
Choosing the right mounting hardware isn't just about convenience - it's about safety. A mismatch between wall type, clock weight, and anchor type creates a 47% higher risk of fixture failure. Let's explore the science behind secure installations.
Identifying your wall type: from drywall to brick
Understanding your wall's composition prevents failures. Here's how to identify common wall types:
- Drywall: Hollow sound when tapped. Exposed gypsum core at outlets confirms it. 85% of modern homes use drywall.
- Plaster: Solid "thud" when tapped. Common in pre-1950s homes over wooden lathes. Requires special anchors.
- Brick/Concrete: Muted tapping noise. Exposed masonry confirms this. Needs masonry tools.
Test with a nail: drywall accepts easily, plaster resists then crumbles, masonry needs power tools. This determines 60% of installation success.
Weighing your options: how clock weight determines the hardware
Every clock challenges gravity differently. Here's the definitive fixture guide:
| Wall Type | Clock Weight | Recommended Fixture | Pro Tip |
|---|---|---|---|
| Drywall (No Stud) | Light (<5 lbs) | Adhesive Hook or Small Nail | Ensure wall is clean for adhesive options. |
| Drywall (No Stud) | Medium (5-20 lbs) | Drywall Anchor + Screw | Never use just a nail. |
| Drywall (With Stud) | Any Weight | Wood Screw | Most secure drywall method. |
| Brick / Concrete | Any Weight | Masonry Anchor + Screw | Requires masonry drill bit. |
| Plaster | Light to Medium | Plaster Anchor + Screw | Drill pilot hole to prevent cracks. |
For clocks over 20 lbs (9.1 kg), wikihow recommends expansion anchors in masonry. Toggle bolts like SNAPTOGGLE® handle 180 lb in drywall. Never exceed 75% of stated limits - real-world conditions reduce capacity by 20-30%.
Metal toggle bolts outperform plastic anchors by 40% in shear strength. Zinc-plated steel masonry anchors resist corrosion in humid environments.
How to hang a clock on a wall: step-by-step instructions

The traditional method: using nails, screws, and anchors
- Locate & Mark: Use a stud finder to identify a wall stud. If unavailable, mark the spot for an anchor. Metal studs need specialized screws. For drywall, studs are typically spaced 16-24 inches apart—use a tape measure to confirm spacing.
- Drill a Pilot Hole: Drill 1/16-inch smaller than the screw/anchor diameter. For masonry, use a hammer drill with a carbide bit to avoid cracks. For drywall, a standard drill suffices—create a clean hole to ensure proper anchor expansion.
- Insert the Anchor: Tap plastic anchors gently until flush. For hollow walls, use toggle bolts. Screw metal anchors directly into the wall. For drywall, choose zip anchors that expand when tightened—these provide 50% more grip than basic plastic anchors.
- Drive the Screw: Use a flat-headed screw with coarse threads. Leave 1/4–3/8 inch exposed. Avoid over-tightening to prevent stripping. For clocks over 15 lbs, opt for a 3/8-inch toggle bolt instead of a standard anchor.
- Hang and Level: Slide the clock onto the screw. Use a level to adjust. For oversized clocks, add a secondary screw at the base. Test stability by gently pulling down on the clock to ensure it resists movement.
For clocks over 20 lbs, expansion anchors are essential. Undersized anchors increase failure rates by 40%. Always check weight ratings on packaging—using a 15-lb-rated anchor for a 25-lb clock risks wall damage.
The no-drill method: using adhesive strips and hooks
- Clean the Surface: Wipe the wall with isopropyl alcohol to remove oils. Let dry for 10 minutes. Skip this step, and adhesive strength drops by 70% due to unseen grime.
- Apply the Strips: Press hooks firmly for 30 seconds. Use multiple strips for heavier clocks (e.g., two strips for 8–10 lbs). For Command™ Strips, follow package instructions for weight limits—exceeding them risks detachment.
- Wait: Allow 1 hour for the adhesive to cure. Touching early reduces strength by 50%. Avoid extreme temperatures—adhesives bond poorly below 65°F (18°C) or in direct sunlight.
- Hang the Clock: Align the hanger and press upward gently. Distribute strips evenly for square-backed clocks. For irregularly shaped clocks, prioritize balance over symmetry to prevent tilting.
Clean walls with isopropyl alcohol. A dirty surface cuts adhesive strength by 70%. Avoid water or glass cleaners—they leave residues that weaken bonds.
Over 60% of renters prefer no-drill solutions. Never exceed 10 lbs with adhesive strips. Avoid textured walls—adhesives work best on smooth surfaces like glass or metal. For uneven textures, use a double-sided mounting tape designed for high weight capacity (up to 4 lbs per 1-inch strip).
For traditional methods, periodically check screws—vibrations from clock mechanisms can loosen hardware over time. For no-drill options, test adhesion by hanging a weight-matched object first. Both methods require planning: measure twice before drilling or applying adhesive to avoid mistakes.
Advanced Tips And Final Security Checks
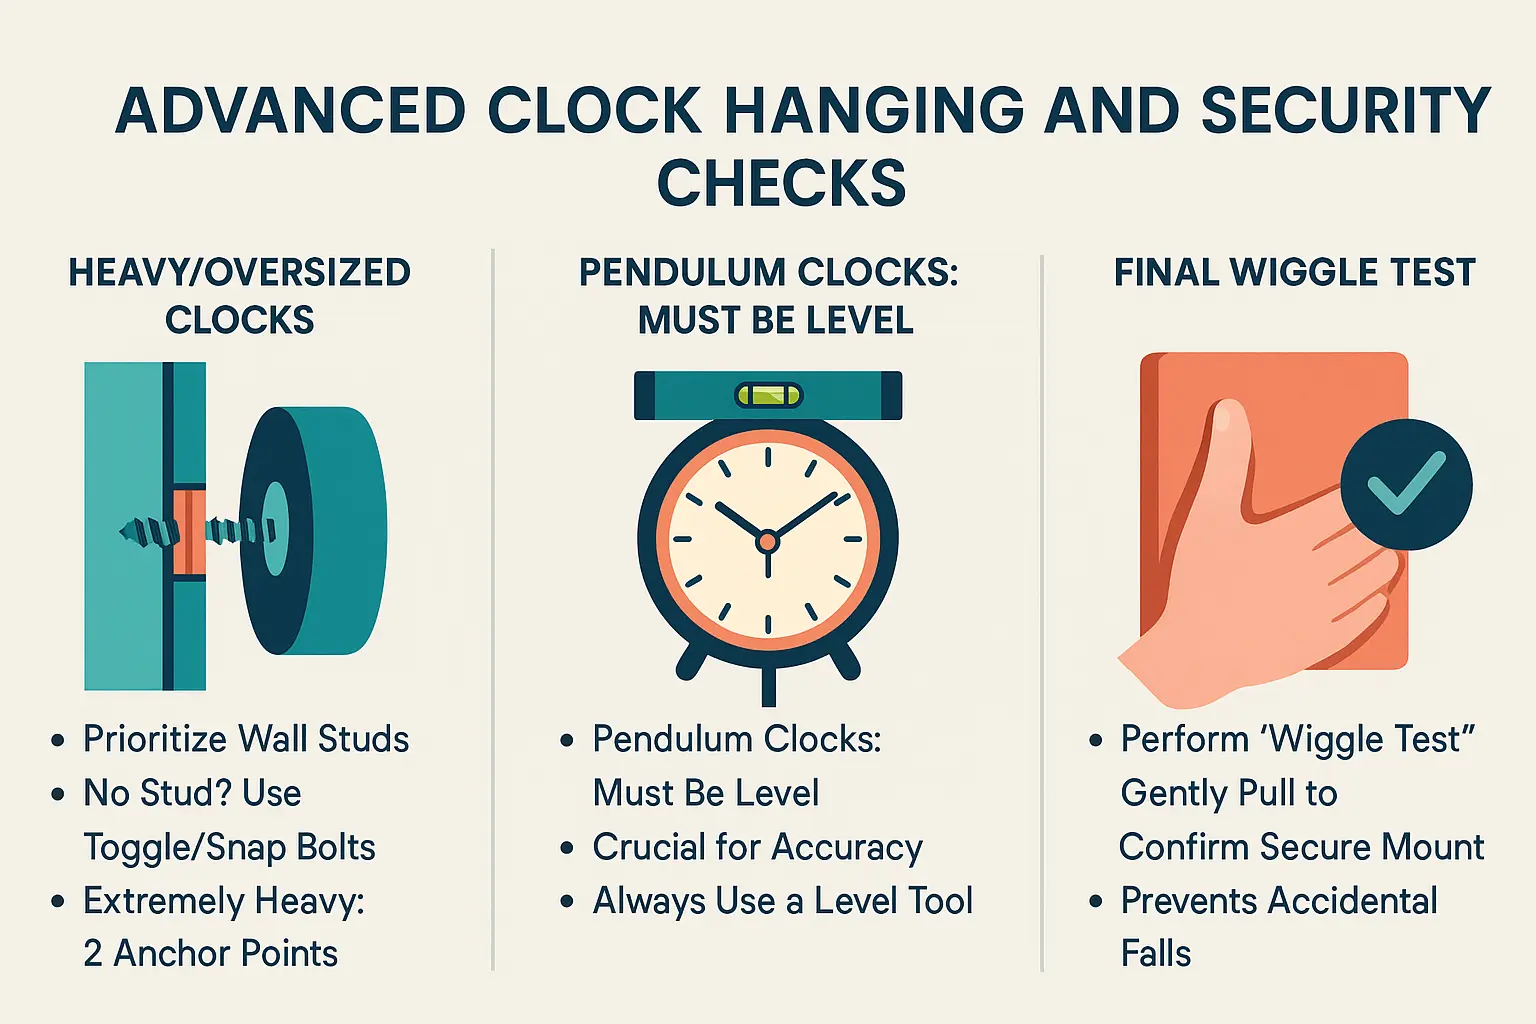
Hanging Heavy Or Oversized Clocks Safely
For clocks exceeding 10 lbs, always anchor into wall studs. If studs aren’t accessible, use heavy-duty toggle bolts or snap toggles designed for hollow walls. These expand behind drywall for even weight distribution. For clocks over 20 lbs, install two anchor points to prevent tilting.
Tip: Pre-drill pilot holes to avoid cracking drywall. Test anchors by applying pressure before hanging the clock.
Special Considerations For Pendulum Clocks
Leveling is critical for pendulum clocks. Even a 2° tilt disrupts the pendulum’s swing, causing inaccuracies. Use a spirit level during installation and recheck after tightening. Secure fixtures before adjusting the pendulum’s length for optimal timing.
Pro tip: Attach a small level to the clock’s top edge during adjustments for real-time alignment feedback.
The Final Wiggle Test: Ensuring A Secure Mount
After mounting, perform the "wiggle test": Gently tug downward to confirm stability. A secure installation should resist movement. If the clock wobbles, recheck anchor tightness or upgrade hardware. This prevents accidents, especially for fragile or oversized models.
Revisit the clock 24 hours post-installation to re-tighten fixtures if needed. Temperature changes or settling walls can loosen anchors over time.
Key Takeaways For A Perfectly Hung Clock
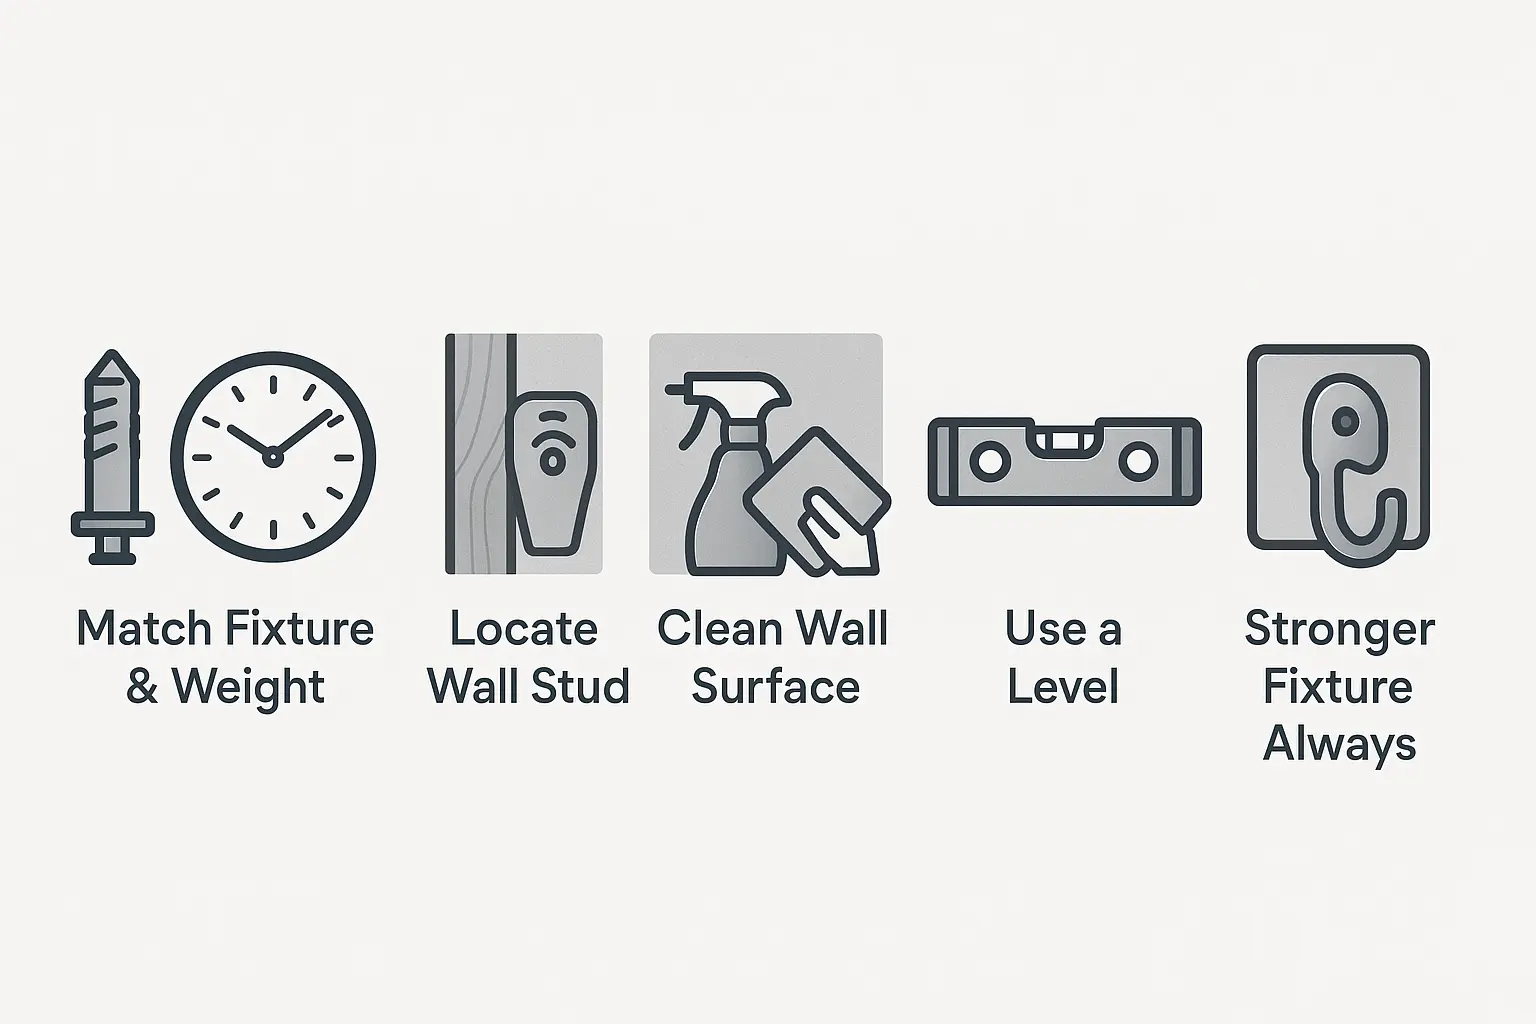
Match fixtures to wall type and clock weight. For example, a 5-pound clock needs a DécoScrew rated for 30 pounds. Avoid generic nails or adhesives—use tested hardware. Locate wall studs for heavy clocks; use toggle bolts for drywall if studs aren’t available. Clean walls before applying any adhesive or hardware. A level is critical: even slight tilts disrupt balance, especially for pendulum clocks.
- Always match the fixture to the wall type and clock weight. This is the golden rule.
- Locate a wall stud for the most secure anchor point, especially for medium to heavy clocks.
- Clean the wall before using any adhesive solution for a bond that lasts.
- Use a level to ensure your clock hangs perfectly straight, which is mandatory for pendulum clocks.
- When in doubt, choose a stronger fixture. Better safe than sorry.
Use tools like Hang&Level to mark drilling points. Center with a CenterFinder or paper template. Insert batteries and set the time before hanging to avoid adjustments. Now, step back and enjoy your perfectly and safely hung timepiece!
 A successful clock installation requires strategic placement, proper hardware, and safety checks. Choose the right location, match fixtures to your clock’s weight and wall type (drywall, brick, plaster), and ensure level alignment—especially for pendulum models. Test stability and prioritize anchors or studs for heavy clocks. Enjoy your securely mounted timepiece!
FAQ
What’s the most reliable method for hanging a wall clock securely?
The best approach depends on your clock’s weight and wall type. For lightweight clocks (under 5 lbs), adhesive hooks or small nails work well. Medium-weight clocks (5-20 lbs) require drywall anchors and screws unless you can secure them directly into a wall stud. Heavy clocks over 20 lbs must be mounted into a stud or use heavy-duty anchors like toggle bolts or masonry anchors for concrete/brick walls. Always use a level to ensure straight placement and test stability with a gentle tug before finalizing.
How do I hang a heavy clock safely without damaging the wall?
For clocks over 20 lbs, prioritize wall studs using a stud finder. If a stud isn’t available, use a heavy-duty anchor like a Snap Toggle, which can hold up to 180 lbs when installed correctly. Avoid nails—they’re unsafe for heavy weights. For concrete or brick walls, pair masonry anchors with a hammer drill. Never exceed the anchor’s weight limit, and consider dual mounting points for extra security.
Can I hang a clock without drilling holes in the wall?
Yes, but only for lightweight clocks (under 5 lbs). Use adhesive hooks like Command Strips, ensuring the wall is cleaned with isopropyl alcohol first. Press firmly for 30 seconds and wait at least an hour for the adhesive to set. This method works best on smooth, clean surfaces but isn’t suitable for humid areas or heavy clocks.
Which walls should I avoid when hanging a clock?
Avoid walls with direct sunlight (fades materials), high humidity (causes corrosion), or near heat sources (warps components). In high-traffic areas or behind doors, clocks risk getting damaged. Feng Shui advises against placing clocks facing entry doors (reflects energy outward) or above beds (causes restlessness). Also, avoid cluttered walls where the clock won’t stand out.
What’s the strongest hook for hanging a clock on drywall?
For drywall, toggle bolts or Snap Toggles are best for heavy clocks, as they expand behind the wall for maximum grip. For lighter clocks, adhesive hooks suffice. Avoid plastic anchors rated below 20 lbs unless used in a stud. Always match the hook’s capacity to the clock’s weight and wall type.
How can I mount a heavy clock without nails or screws?
For heavy clocks without nails, use toggle bolts or masonry anchors. Toggle bolts (like the “Scary Metal Toggle Bolt”) are ideal for drywall, while masonry anchors work for concrete/brick. These require drilling but provide secure support. Alternatively, dual mounting points distribute weight evenly. Avoid adhesives or lightweight anchors for heavy items.
Is a drywall anchor necessary for hanging a clock?
Only if you can’t locate a stud. For clocks over 5 lbs, drywall anchors (e.g., ribbed or medium-duty anchors) provide stability. Never use nails alone for medium/heavy clocks. For optimal safety, always pair anchors with screws and ensure they’re rated for the clock’s weight.
What’s the safest way to hang an extra-heavy item on any wall?
For items over 20 lbs, always mount into a wall stud. If unavailable, use heavy-duty toggle bolts (like Snap Toggles) rated for the weight. For brick/concrete, use masonry anchors with a hammer drill. Distribute weight across two anchors for objects over 50 lbs. Test stability by pulling gently before finalizing.
Which tools are essential for hanging a wall clock?
A tape measure, pencil, and level ensure accurate placement. A stud finder and drill are critical for secure mounting. Use a hammer for nails or adhesive hooks. Choose anchors/screws rated for your clock’s weight. For no-drill solutions, opt for adhesive hooks and isopropyl alcohol to prep surfaces. Always double-check with a level, especially for pendulum clocks.